Sunday, February 21, 2010

Apple Mail Won't Authenticate GMail

The Apple Mail Gmail Problem

You have problems with Apple Mail authenticating and downloading new mail from your Gmail account. A window pops up asking for your user name and password. You enter the correct password, but it doesn't work. It's obviously broke, what's wrong?

The Solution

Go to https://mail.google.com/ in your browser (Firefox, Safari, etc) and log in with your user name and password. If I'm correct, you will have to fill out a "CAPTCHA" which is the picture with one or two words that you need to enter. Once you have completed the captcha and logged in, you can log out if you wish and go back to Apple Mail. You may have to authenticate one more time, but this time it will work!

The Explanation

Somehow an authentication failed, meaning you or someone else tried to log in and used the wrong number. Possibly a network error occured while Apple Mail was trying to authenticate. The result is that Google will then require you to prove that you are not a robot trying to crack intoCHAthat email. They do this with a CAPTCHA. Since Apple Mail doesn't know about the CAPTCHA, it will continue to fail until you log into your account through your browser (firefox, safari, etc.)

Monday, April 27, 2009

mysql backup scripts with cron

Here's how I automatically backup my mysql databases on my DreamHost account. I use three shell scripts and a cron job to run them at regular intervals. The databases get backed up hourly. The backups are saved hourly, daily, and weekly. The weekly archive gets a unique name and is therefore not overwritten.

mysql_hourly.sh


#!/bin/bash

# This script backs up mysql databases; appends hour 00 to 23
# Overwritten daily
# Run from crontab ever hour on 30-minute mark (30 * * * *)
# Requires mysql_daily script

suffix=$(date +%H)

# Repeat for each database
mysqldump --opt -u USER -pPASSWORD -h HOST DATABASE > ~/backups/hourly/my_mysql_db.$suffix


Note that I use the short option form (-p), so you cannot have a space between the option and the password. Complete documentation for mysqldump.

mysql_daily.sh


#!/bin/bash

# This script copies the last backup of the day to a daily archive 00 to 06
# overwritten weekly
# Run at hour 23 hours 40 minutes every day (40 23 * * *)
# Requires mysql_hourly script

suffix=$(date +%d)

cp ~/backups/hourly/my_mysql_db.23 ~/backups/daily/my_mysql_db.$suffix


mysql_weekly.sh


#!/bin/bash

# This script copies the last backup on friday to a weekly archive
# Never overwritten
# Run at hour 23 hours 45 minutes every friday. (45 23 * * 5)
# Requires mysql_hourly script

suffix=$(date +%Y%m%d)

cp ~/backups/hourly/my_mysql_db.23 ~/backups/weekly/my_mysql_db.$suffix


The crontab runs the scripts on a regular schedule. Here is how I run the scripts above. By the way, don't forget to make the scripts ececutable (chmod +x from the command line or use your ftp program).

my dreamhost crontab


# see http://wiki.dreamhost.com/index.php/Crontab

# minute (0-59),
# | hour (0-23),
# | | day of the month (1-31),
# | | | month of the year (1-12),
# | | | | day of the week (0-6 with 0=Sunday).
# | | | | | commands

MAILTO=your@email.com

# Runs the mysqlbackup script hourly (on the half hour), and the daily at 11:45pm every day
30 * * * * ~/lib/scripts/mysql_hourly.sh
45 23 * * * ~/lib/scripts/mysql_daily.sh
45 23 * * 5 ~/lib/scripts/mysql_weekly.sh


Of course put your email address on the MAILTO line.

DreamHost has a very nice cron job front end in its "Goodies" section of the control panel. However, it runs the hourlys on the hour, and the dailys at midnight. I like to set the time to the minute, so I use ssh from the terminal to log in and st up the cron job. Here is the drill (commands shown in double quotes - don't type the double quotes} :

First login to your server via SSH in terminal(enable ssh from the "Users" web panel): "ssh username@mydomain.com"

Once logged into your server, list your current crontab file: "crontab -l"

Set your editor to vim (you can also put this in your bashrc or bash_profile): "export EDITOR='vim'"

now edit the crontab: "crontab -e"

type "i" to enter insert mode, type or cut and paste your code in (if you cut and paste, use notepad or textedit or other real text editor, not MS Word, etc.) I think you need to have a line return (blank line) at the end of your code.

Hit the "esc" button to exit insert mode, then type ":wq!" or ":x" to save and exit. Type "crontab -l" to check your work, then "exit" to log out from ssh.

Restoring from your backup: "mysql -u user_name -p -h hostname database_name < dumped_file"

More Docs from the DreamHost Wiki:


Backup your database.
Restore your database.

Labels: ,

Movable Type Asset Tags

Asset Tag Input : Convert text field to Radio Buttons or checkboxes


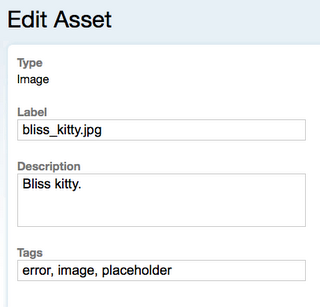
Movable Type assets (images, docs, pdfs, xls, virtually any document) can be uploaded and managed through MT's dashboard. A label, description, and tag(s) can be assigned. I use the asset tags to selectively list assets on my blog's index pages. The problem is that it is hard to remember what is the exact wording of the tag (capitalized, plural, etc.), because tags are entered in a text form. And I certainly don't want my clients to have to remember which tags to use.

Here's the Original "Edit Asset" Panel


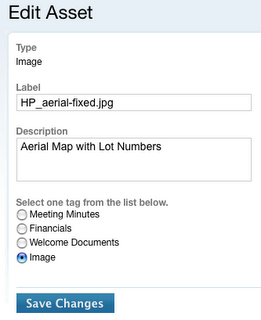
Same Panel with Radio Buttons


This limits the choice of asset tags, but then that is the point. I had to edit two MT system files to accomplish this. Fortunately, it's the same change in both files.

Edit These Files (backup first)


mt/tmpl/cms/dialog/asset_options.tmpl
mt/tmpl/cms/dialog/edit_asset.tmpl

Replace the Following Code (same in both files)


<mtapp:setting id="tags" label="<__trans phrase=" tags="">"
label_class="text-top">
<div class="textarea-wrapper">
<input name="tags" id="tags" class="full-width" value="<$mt:var name=" tags="" escape="html">" autocomplete="off" />
</div>
</mtapp:setting>


With the new code


<mtapp:setting
id="tags"
label="<__trans phrase="Select one tag from the list below.">"
label_class="text-top">
<ul class="edit-tag-radio">
<li><label><input type="radio" name="tags" id="tags" value="minutes"<mt:if name="tags" eq="minutes"> checked="checked"</mt:if> /> <__trans phrase="Meeting Minutes"></label></li>
<li><label><input type="radio" name="tags" id="tags" value="financial"<mt:if name="tags" eq="financial"> checked="checked"</mt:if> /> <__trans phrase="Financials"></label></li>
<li><label><input type="radio" name="tags" id="tags" value="welcome-document"<mt:if name="tags" eq="welcome-document"> checked="checked"</mt:if> /> <__trans phrase="Welcome Documents"></label></li>
<li><label><input type="radio" name="tags" id="tags" value="image"<mt:if name="tags" eq="image"> checked="checked"</mt:if> /> <__trans phrase="Image"></label></li>
</ul>
</mtapp:setting>


Note that the "value" and "__trans phrase" values are particular to your project. Also more options can be added.

Prefer a Checkbox?


If you prefer a checkbox list instead of radio (allowing multiple selections), just use type="checkbox".

Labels: ,

Sunday, December 7, 2008

Check apache configuration.

How to check your apache configuration from the command line:

'apachectl configtest' or 'apachectl -t' tests the configuration files, including httpd.conf .

'apachectl -S' checks virtual hosts.


Of course apachectl does other useful things.

Labels:

Wednesday, July 30, 2008

Cyberduck FTP Client and regular expression filters

The Cyberduck FTP client is an amazing open-source application for Mac OS X. One reason I like it is the built-in regular expression filter for (one each for upload and download). Configure the filter from Preferences => Transfers => Advanced panel. For example, the attached regular expression filters out some common images and video files. Note that the expression is case sensitive.
regex_filter.txt

Labels: ,

Saturday, July 5, 2008

Free Project Planner

GanttPV is free cross-platform (Mac, Linux, and Windows) project manager software. Installion on a mac was simple. Documentation is not so good. I was a bit stumped as to how to apply "prerequisites" across projects. I found the answer in the GanttPV forum here. Here's the instructions:

GanttPV supports multiple projects and cross-project task dependencies. If I were defining a sub-project, here is what I would probably do:

- Make sure that task parenting is installed (run "Install Task Parenting"). The script makes it possible to define a parent task for a task.
- Define the sub-project as a separate project. (Use the Project ID column to move tasks to the new sub-project if necessary.)
- Create a task in the parent project to represent the sub-project. Define its prerequisites and successors. (Faster to do this before children are defined. GanttPV v0.8 ignores parent tasks when chaining; after you specify the children, prerequisites involving parents have to be set for one task at a time.) (Alex - should we change this?)
- Add the Task ID columns to the parent project task report. Note the ID of the sub-project task.
- Add the Task ID and Parent Task ID columns to the sub-project task report.
- Enter the parent's sub-project's Task ID into the Parent Task ID column of each of the highest level tasks in the sub-project.


I created the main "parent" project and named it "WebDev". I then created a "Task Report". Within that parent task report I added a new "task row" for each of my clients, plus one for myself. Each of these task rows need only contain the name of a client. Add an "ID" column so that you can see what the ID for each row containing the client. We'll need to know that in the next step. Also add a "Prerequisite" column.

Now go back to the main window, and create new projects for each of the clients named as a task in the previous step. Create a task report for each client. Open that task report. The first task in the client report is the name of the website I'm working on. Add 2 columns, "ID" and "Parent Task ID". In that first row corresponding to the website task, add the client ID from the main parent project into the "Parent Task ID" column. Also make that first row corresponding to the website task the Parent for subsequent rows (tasks) concerning that website. Repeat for each client project. Now I can edit the "subprojects" individually, and see the overall Gantt chart in the parent "WebDev" task report. By setting the prerequisites in this main window, I get a nice Gantt chart laying out the time requirements across all the client subprojects.

Anyway that's how I set it up.

Labels: ,

Monday, June 30, 2008

Creating a remote website mirror for development.

Problem: Client needs access to up-to-date website files to make updates, but I don't want him to edit the live site.

Solution: Create dev.mysite.com and an ftpuser for that domain. Use that ftpuser to place a mirror of the website within that subdomain. Since my links are relative, browsing works fine. Absolute links, of course, will remove you from the dev subdomain. Either way, replacing "www" with "dev" in the url gets you to the counterpart in the dev website.

Labels: